Creating the right sound in a music studio is not just about the equipment. The space itself matters a lot. One of the best ways to improve the sound quality in a studio is by using sound dampening panels. These panels help reduce echo and unwanted noise, making your recordings clearer and more professional. But with so many options out there, it can be hard to know what type of sound dampening panels you should use for a music studio. In this blog, we’ll break it down in simple English.
Note : Start building your perfect setup with high-quality sound dampening panels today. Whether you’re recording vocals or mixing beats, the right panels can make a big difference. Don’t wait—give your music the clarity it deserves
Why Sound Dampening Panels Are Important in a Music Studio
Sound clarity is key in recording
In a music studio, you want the sound to be as clear as possible. If there’s too much echo or background noise, it can ruin a good recording. Sound dampening panels help absorb unwanted sounds and stop them from bouncing around the room.
They help create a balanced sound
Without panels, some sounds might become too loud while others get lost. Panels help balance the sound, so everything is heard as it should be.
They improve focus and comfort
A quiet and controlled space helps musicians and producers focus better. It also makes the space more comfortable to work in for long hours.
Understanding the Basics: What Are Sound Dampening Panels?
Panels that absorb sound
Sound dampening panels are made of soft materials like foam or fabric. These materials absorb sound waves instead of letting them bounce around.
Not the same as soundproofing
Many people confuse sound dampening with soundproofing. Soundproofing blocks sound from entering or leaving a room. Sound dampening is about improving the sound inside the room by reducing echo and reverb.
What to Look for in Sound Dampening Panels for a Music Studio
Material quality
Good panels are made from high-quality foam, fiberglass, or acoustic fabric. These materials do a better job of absorbing sound.
Thickness and size
Thicker panels usually absorb more sound. The size of the panel also matters depending on the size of your room.
Fire safety
If you’re putting panels in a professional space, make sure they meet fire safety standards.
Easy to install
Look for panels that are easy to mount on walls or ceilings. Some come with adhesive backing or mounting kits.
Types of Sound Dampening Panels for a Music Studio
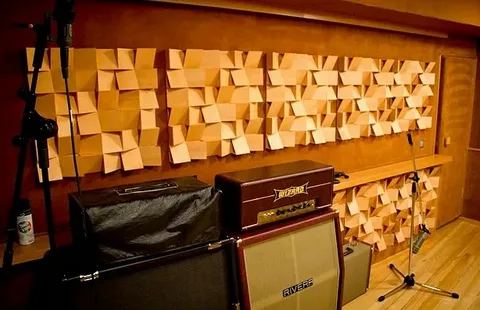
1. Acoustic Foam Panels
What they are:
These are the most common type of sound dampening panels. They are usually shaped like wedges or pyramids.
Where to use them:
Place them on the walls around your recording area to reduce echo and sound reflection.
Pros:
- Affordable
- Easy to install
- Works well for basic sound treatment
Cons:
- Not very stylish
- Not as effective as other options for low-frequency sounds
2. Fabric-Wrapped Panels
What they are:
These are made with a sound-absorbing core like fiberglass or mineral wool, covered in a nice-looking fabric.
Where to use them:
They work well on walls and ceilings and are great for control rooms and vocal booths.
Pros:
- Very effective at absorbing a wide range of sounds
- Looks professional
- Can be custom-made in different colors
Cons:
- More expensive than foam panels
- Heavier and may need stronger mounting
3. Bass Traps
What they are:
Bass traps are panels designed to absorb low-frequency sounds. These sounds often build up in corners of rooms.
Where to use them:
Place bass traps in the corners of your studio where bass sounds tend to collect.
Pros:
- Great for managing bass
- Helps create a balanced mix
Cons:
- Can be large and bulky
- Usually more expensive than regular panels
4. Ceiling Clouds
What they are:
These are sound-absorbing panels that hang from the ceiling.
Where to use them:
Best for large studios or rooms with high ceilings.
Pros:
- Helps absorb sound from above
- Reduces echo in large spaces
Cons:
- Requires ceiling mounts
- Can be harder to install
5. Diffusers
What they are:
Unlike absorbers, diffusers scatter sound waves. This helps avoid sharp echoes and creates a more natural sound.
Where to use them:
Place them on back walls or ceilings in mixing rooms.
Pros:
- Keeps the room from sounding “too dead”
- Improves sound quality without over-absorbing
Cons:
- More expensive
- Needs to be used with absorbers for best results
How to Choose the Right Panel for Your Studio
Think about your room size
A small home studio won’t need the same panels as a large professional studio. Measure your space and plan where to place the panels.
What type of music are you recording?
If you’re working with a lot of bass-heavy music, bass traps are a must. For vocals, fabric-wrapped panels might work better.
Mix and match
Most studios use a mix of different panels. Foam panels, fabric panels, and bass traps together can create a well-balanced space.
Where to Place Sound Dampening Panels in a Music Studio
Start with the reflection points
These are the spots where sound bounces directly off the walls. Use foam or fabric panels here.
Don’t forget the corners
Bass builds up in corners. That’s where you should put your bass traps.
Treat the ceiling if needed
If you notice sound bouncing from above, ceiling clouds can help.
Use diffusers for balance
Place diffusers on the back wall or ceiling to make the sound feel more natural.
Tips for Getting the Best Results
Use a sound test
Play music or clap your hands in different parts of the room to find where the sound bounces. That’s where you need panels.
Don’t overdo it
Too many panels can make your room sound too dull. You want to absorb the bad sound, not kill all the energy.
Try before you buy
If possible, test different types of panels in your room before making a big purchase.
Ask for expert help
If you’re not sure, talk to a sound engineer or acoustic expert. They can help you plan your studio setup.
Final Thoughts
Choosing the right sound dampening panels for a music studio can make a huge difference in your recordings. It helps reduce echo, manage noise, and create a balanced sound. Whether you’re working in a home studio or a professional space, the right panels can turn your room into a proper recording environment. Start simple, focus on the most important spots, and add more panels as needed.
If you’re setting up a music studio and want clear sound, take the time to choose the right panels. Your ears (and your listeners) will thank you!
For more insightful articles related to this topic, feel free to visit : bdnews55